
TL;DR? Click here for minimum imaging requirements
TECHNIQUE:
INDICATIONS:
1. Assessment for pericardial effusion and evidence of tamponade
2. Assessment of global cardiac contractility (qualitative)
3. Detection of central venous volume status (IVC measurement)
The goal of the basic cardiac ultrasound is to evaluate the basic systolic function of the heart (Is the heart contracting normally?) as well as to evaluate the pericardium for effusion. IVC measurement, while controversial, can help assess the patient's overall central venous volume status.
REQUIRED IMAGES:
HOW TO SCAN:
Anatomy
Under normal circumstances, the pericardium is fused with the muscular wall of the heart, and although the pericardium contains a small amount of physiologic fluid, this is not visible sonographically. As such, it is a potential space. Any amount of visible fluid in the area is abnormal.
The heart lies obliquely in the chest, thus making standard imaging planes difficult. As such, when evaluating the heart with ultrasound, a specific set of nomenclature regarding views and relative position are used. For the purposes of basic cardiac ultrasound, it is important to know the sonographic appearance and relative position of the four chambers of the heart, as well as the anatomic relationship of the heart and surrounding structures. We will also refer to the heart in two axes; the long axis, and the short axis. This refers to the intrinsic axis of the heart as it lies in the chest, and therefore is not analogous to the axes of the body. The long axis will refer to the axis which runs longitudinally through the ventricles, and runs obliquely roughly in the plane which runs from the patient's right shoulder to the left hip. Conversely, the short axis is perpendicular to this, thus cutting the ventricles in cross section. It lies roughly in the plane running from the patients left shoulder to right hip.


Cardiac Exam
Probe selection:
The probe of choice is the phased array probe as it has lower frequency and can penetrate deeply while being able to utilize intercostal windows. Although curvilinear probes have a similar frequency range, their size will not be amenable to obtaining appropriate imaging windows in the vast majority of cases.


Mode Selection and Probe Orientation:
A common point of confusion for beginning sonographers, the cardiac exam is unique in that the convention for probe orientation was defined by cardiologists. This can lead to significant frustration in EM physicians as it requires a change in mindset when obtaining images.


For the purpose of instruction, we will adopt the cardiology conventions as these are more widely accepted by cardiologists and intensivists.
First, set the exam preset on the machine to ‘cardiac’ mode. This will do several things. First, and most notably, it will reverse the probe indicator on the screen from the top left of the screen to the top right. This will mean that the image on the screen will appear as a ‘mirror image’ of what one may expect with abdominal mode settings. Although this may be confusing at first, you will see that if you simply follow the guidelines for the orientation of the probe while obtaining these images, you will see the expected orientation on the screen!
A good rule of thumb for remembering this is: Cardiac settings = indicator always left, Abdomen settings = always right, EXCEPT parasternal long because “long is wrong”
Placing the machine in a dedicated ‘cardiac’ mode will improve contrast optimization for the cardiac structures, and allow higher frame rate- which will improve visualization of the cardiac structures in motion. It will also allow for access to measurement tools specific to monitoring cardiac function.
Positioning
The exam is best performed with the patient in the supine or left lateral decubitus (LLD) position. Placing the patient in LLD can help optimize views in the patient with difficult to obtain windows.
The views:
Subcostal/subxiphoid
Identify the patient’s xiphoid process. Place the probe down transversely, in the patient's right xiphosternal notch, with the indicator facing towards the patient’s LEFT. (Note that the orientation is different from traditional due to the change to ‘cardiac mode’
Aim the probe between the patient's head and left shoulder. You will need to flatten the angle of the probe to the skin, and apply gentle pressure downwards such that the probe handle is laying on the patient.
Search for cardiac image by fanning in the anterior/posterior plane and adjusting angle towards and away from the left shoulder
You should see an image of liver in the near field of the image, with adjacent coronal 4 chamber view of the heart in the far field. Separating them should be the hyperechoic line formed by the pericardium and liver capsule.
Assess for cardiac function, and pericardial effusion, which will appear as rim of anechoic fluid surrounding the heart, most apparent in the space between liver and pericardium. Note that this view is the most sensitive for fluid in this location.
If you have trouble with this view, first make sure your depth setting is adequate. You can also try sliding the probe towards the patient’s right, in an attempt to use the liver as an acoustic window.
![By Patrick J. Lynch and C. Carl Jaffe [CC BY 2.5 (http://creativecommons.org/licenses/by/2.5)], via Wikimedia Commons](https://images.squarespace-cdn.com/content/v1/53c1a2cce4b0e88e61f99b70/1501813953921-EQWEPW9C2QWPBS2UVGLA/Subcostal.gif)
By Patrick J. Lynch and C. Carl Jaffe [CC BY 2.5 (http://creativecommons.org/licenses/by/2.5)], via Wikimedia Commons
Note that a pericardial effusion will most commonly be circumferential and anechoic. Do not be confused by an epicardial fat pad, which will be an isolated mixed echogenicity collection anteriorly:
Fat pad= internal echoes, anterior, does not change size or shape with cardiac cycle.
Effusion= anechoic, may change shape or location with cardiac cycle and patient positioning.
Note fluid collection anterior and circumferential to heart in subxiphoid view
Parasternal Long Axis:
Place the probe at the 3rd or 4th intercostal space, just lateral to the left sternal border. Orient the probe such at the indicator is pointing towards the patient’s right shoulder
Rotate the probe on its axis until you are able to obtain an imaging window through the intercostal space rib shadows. Then fan the probe superior to inferior to obtain a view of the heart.
If unsuccessful, proceed systematically by searching the 3-5 intercostal spaces in a similar fashion. Side the probe inferiorly to each next intercostal space. If still unsuccessful, slide laterally along each intercostal space until an appropriate image is found.
An adequate view will be in the plane which includes the mitral valve, aortic valve, and cardiac apex, with right ventricular outflow tract in the near field and LV in the far field. Normally, the LV will appear larger, thicker and more muscular compared to the RV.
Look for a pericardial effusion posterior to the heart, which will appear as an anechoic stripe in the far field, just adjacent to the LV
![By Patrick J. Lynch and C. Carl Jaffe [CC BY 2.5 (http://creativecommons.org/licenses/by/2.5)], via Wikimedia Commons](https://images.squarespace-cdn.com/content/v1/53c1a2cce4b0e88e61f99b70/1501814226389-VJ5C61AEPQILCTRUVRU5/LeftParasternalLongAxis.gif)
By Patrick J. Lynch and C. Carl Jaffe [CC BY 2.5 (http://creativecommons.org/licenses/by/2.5)], via Wikimedia Commons
Note that a pleural effusion in this area can be easily mistaken for pericardial effusion. These can be differentiated by looking at the relationship of the fluid to the descending aorta. If the fluid passes anteriorly to the descending aorta, the fluid is pericardial in origin. If it passes posteriorly or does not separate the LV and descending aorta, it is likely pleural in origin.
Note pericardial effusion in the far field of the adjacent image. It can be seen tracking anterior to the descending aorta. (which appears in cross section as an anechoic circle just posterior to the left atrium)
Parasternal Short Axis:
Obtain an adequate parasternal long axis view, as above.
Rotate the probe 90 degrees, such that the probe indicator is now pointing to the patient’s left shoulder
This will place the ventricles in cross section, with the right ventricle appearing crescent shaped, located leftward and anterior to the left ventricle on the screen. The LV can be identified by its thicker walls and round shape.
This view can be obtained at multiple levels along the long axis of the heart
Cardiac apex
Papillary muscles
Mitral valve
Base of the heart
However, the primary level of assessment for basic purposes will be at the mid papillary level. Fan along the long axisof the heart as shown below to obtain this view
![By Patrick J. Lynch and C. Carl Jaffe [CC BY 2.5 (http://creativecommons.org/licenses/by/2.5)], via Wikimedia Commons](https://images.squarespace-cdn.com/content/v1/53c1a2cce4b0e88e61f99b70/1501814531628-WQ9HCO8O9S79TPMMZ883/LeftVentricleShortAxis.gif)
By Patrick J. Lynch and C. Carl Jaffe [CC BY 2.5 (http://creativecommons.org/licenses/by/2.5)], via Wikimedia Commons
This is a good level to assess relative size of the ventricles, contractility of LV, and presence of effusion (which will again appear in the far field, posterior to the LV). Further applications at other cross-sectional levels are also used in advanced cardiac ultrasound.
Example of very large, circumferential pericardial effusion with tamponade physiology in parasternal short axis view
Apical four chamber view:
Place the probe over the expected apex of the heart with the probe marker directed towards the patient's left. Traditionally this can be approximated as the location of the PMI. Alternatively, one can begin at searching in the 4th/5th intercostal space, just inferior and medial to the nipple.
Aim the probe approximately 10-30 degrees to point towards the patient’s right shoulder. You may need to slide medially and/or change interspaces in order to obtain the appropriate image.
Attempt to obtain a 4 chamber view with the atria at the far field of the image, and the ventricles in the near field of the image. The septum should appear vertically oriented in the center of the screen. This will separate the screen into two halves. The left heart should appear on the right side of the screen and the right heart on the left side of the screen. You should also be able to visualize the mitral and tricuspid valves separating the atria from the ventricles.
If you have trouble obtaining this view, try starting with a parasternal long axis view and sliding to the apical view. LLD position is also extremely helpful for this view in particular, as it brings the heart closer to the chest wall and may displace lung tissue. Another tip for finding the apical view is to start where just inferior to the nipple and if it not visualized there, move the probe in concentric circles until cardiac motion is identified then optimize image with sweep, fan and rock.
This is a good view for viewing general cardiac function. It is also used to compare right heart function to left heart function, which will become more important in advanced cardiac ultrasound. A pericardial effusion in this view will appear to wrap around the apex of the heart and surround the ventricles.
![By Patrick J. Lynch and C. Carl Jaffe [CC BY 2.5 (http://creativecommons.org/licenses/by/2.5)], via Wikimedia Commons](https://images.squarespace-cdn.com/content/v1/53c1a2cce4b0e88e61f99b70/1501941050313-7JVUV32JEFM9WHDTVJOI/3.5.png)
By Patrick J. Lynch and C. Carl Jaffe [CC BY 2.5 (http://creativecommons.org/licenses/by/2.5)], via Wikimedia Commons
IVC
Obtain a subxiphoid cardiac view (as above)
Rotate the probe 90 degrees such that the probe indicator is towards the patient's head
Attempt to keep a partial view of the right atrium, while fanning the probe slightly towards the patients right
As you fan, the liver will become prominent in the near field, and the IVC should come into view just deep to it. It will appear as a hypoechoic pipe-like structure.
You will likely need to rotate the probe slightly to catch a true longitudinal section of the IVC in its long axis
Optimize the image using sweep, fan and rock to visualize the IVC draining into the right atrium. You may also see hepatic veins draining into the IVC before it meets the right atrium
Place M mode marker 2cm from the IVC-RA junction to measure the IVC during various phases in the respiratory cycle.
In this view, it is important to differentiate the IVC from the aorta which runs alongside it. You can confirm that you are looking at the IVC by finding locations where hepatic veins drain into it, as well as by directly visualizing the junction of IVC and right atrium.
Keep in mind, color doppler is not helpful in differentiating IVC from aorta, as they will both have pulsatile flow!
When using IVC measurement to assist in determination of central venous volume status, use the general cutoffs below to assist you.
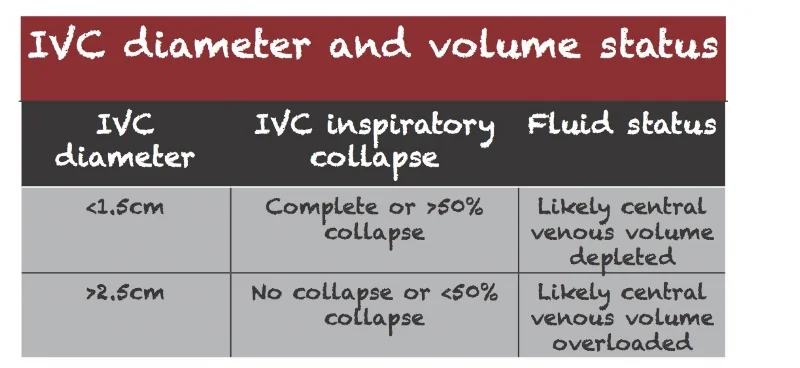
As always, there are caveats to the above guidelines. Altered cardiopulmonary function (CHF, Valvular disease, Pulmonary HTN) may influence these numbers and lead to false interpretation. These values must be interpreted in a clinical context in order to come up with an accurate assessment of volume status.
Example of normal appearing IVC with moderate respiratory variation
Example of distended, plethoric IVC with minimal respiratory variation indicative of fluid overload
IMAGE INTERPRETATION
Pericardial Effusion:
Is there a pericardial effusion?
Pericardial fluid will generally appear as an anechoic stripe in the dependent portion of the heart. This will vary as described above for each particular view in cardiac ultrasound. It is important to differentiate pericardial fluid from pleural, or even intra abdominal fluid as these can sometimes look similar. Pericardial fluid can look heterogeneous and not purely anechoic in the setting of complex effusions (blood, pus, fibrous exudate), but an epicardial fat pad can also appear heterogeneous.
What is the size of the effusion?
Small effusions are generally isolated to the dependent portions of the heart. (namely posteriorly and inferiorly to the LV). Moderate effusions will begin to extend further along the sides of the heart. Large effusions will be circumferential. Tamponade is a clinical diagnosis, but is suggested by a large effusion with collapse of the right ventricle and/or right atrium in diastole. A distended, plethoric IVC in this setting can also be indicative of tamponade
See below for examples of large effusions suspicious for tamponade physiology (click to enlarge):


Global cardiac function:
Providers can use cardiac ultrasound to make a general assessment on cardiac function. In general, for the purposes of basic cardiac ultrasound, this will be limited to qualitative assessment of systolic function, or ejection fraction.
Is the heart function hypodynamic, normal, or hyperdynamic?
While there are also ways to measure systolic function quantitatively, this refers to simple visual assessment of cardiac function.
Parasternal Long axis
Hypodynamic with LV hypertrophy and moderate pericardial effusion
Normal systolic function
Hyperdynamic systolic function in a patient with sepsis
Parasternal Short Axis
Hypodynamic LV function
Normal LV
Hyperdynamic function in patient with volume loss
Apical 4 Chamber
Hypodynamic with mild circumferential pericardial effusion
Normal systolic function
Hyperdynamic function in patient on pressors
Is there organized cardiac activity?
Ultrasound can also be used in the setting of cardiac arrest to assess for mechanical function of the heart. In this scenario, ultrasound can help better define the underlying rhythm. Cardiac standstill, fine ventricular fibrillation, or organized cardiac activity otherwise missed on pulse assessment may be visible on ultrasound and assist in management in the acute setting. Generally, subxiphoid/subcostal windows are the best for this purpose as they will not interfere with chest compressions. Note that in this setting, flickering of valves alone does not consitutute cardiac activity.
Written by: Aalap Shah, MD
Peer reviewed by: Lori Stolz, MD, RDMS
Images obtained by Pattie Smith, RDMS and Aalap Shah, MD except as otherwise noted
References
Block, Berthold. Color atlas of ultrasound anatomy. New York: Thieme, 2012. Print.
Dawson, M., and M. Mallin. Introduction to Bedside Ultrasound: Volume 1. Lexington, KY: Emergency Ultrasound Solutions, 2013. ebook
Moore, C. (2008), Current Issues with Emergency Cardiac Ultrasound Probe and Image Conventions. Academic Emergency Medicine, 15: 278–284. doi:10.1111/j.1553-2712.2008.00052.x
Noble, Vicki E., and Bret Nelson. Manual of Emergency and Critical Care Ultrasound. Cambridge: Cambridge UP, 2011. Print.
Smith, Pattie. Bedside Ultrasound Guide for Emergency Medicine. Cincinnati, OH. Print
Ultrasound Guidelines: Emergency, Point-of-Care and Clinical Ultrasound Guidelines in Medicine. Ann Emerg Med. 2017;69(5):e27-e54.